 Save
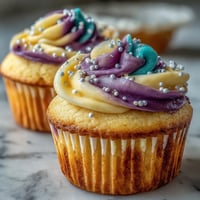
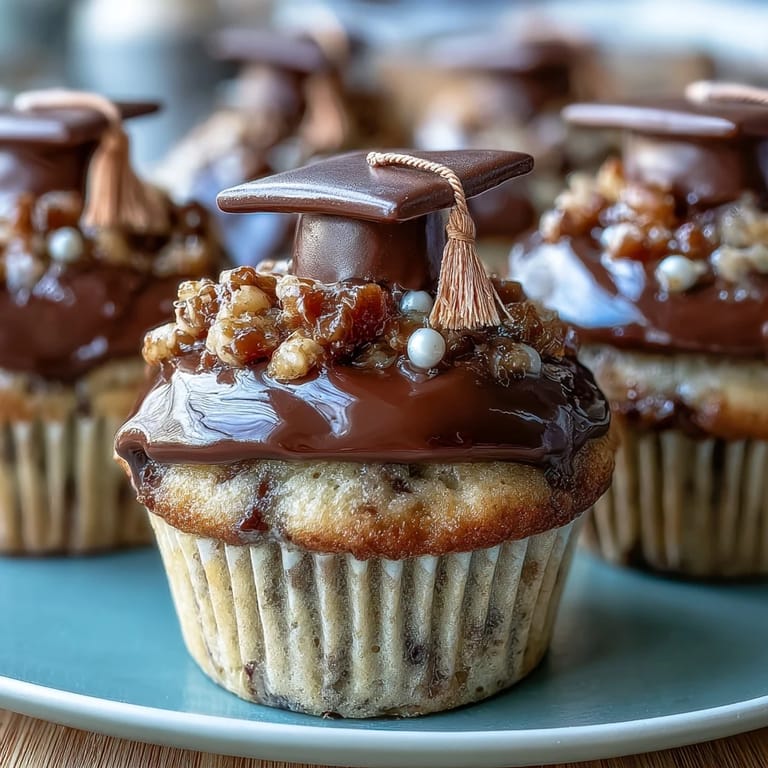
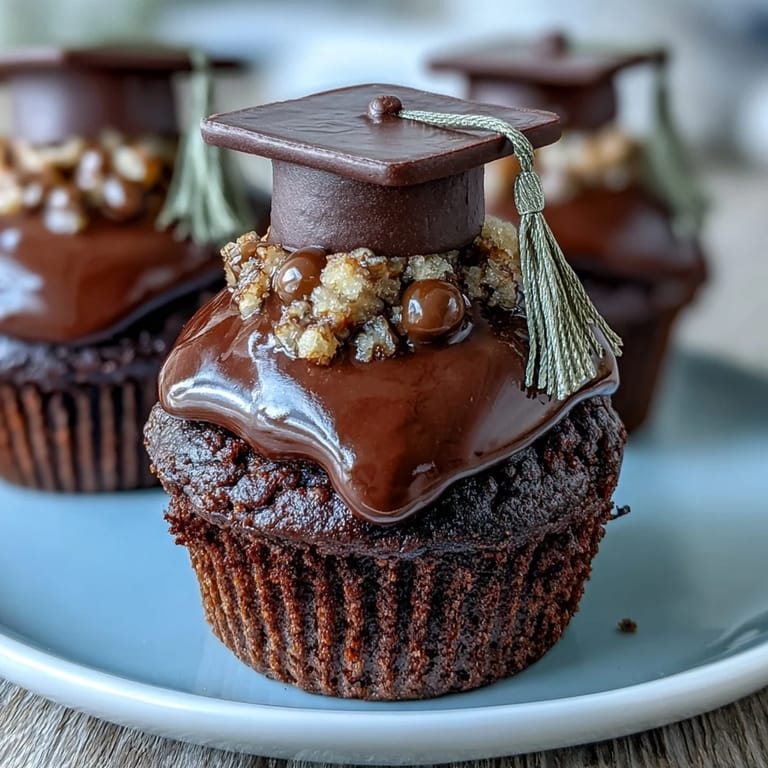
Save My cousin texted me three weeks before her graduation asking if I could bring something special to her party, and honestly, I panicked a little. Then I remembered watching my mom decorate cupcakes years ago, and it clicked—why not make something that looked as impressive as it tasted but didn't require me to be a pastry chef? These graduation cap cupcakes became my answer, and they turned out to be the kind of thing people actually photograph and ask for the recipe of. Soft vanilla cake, creamy frosting, and these ridiculous little edible graduation caps that took maybe ten minutes to assemble once I stopped overthinking it.
I brought a box of twelve to my cousin's backyard celebration, and watching people's faces light up when they realized the little caps were edible was worth every minute. One of her friends immediately asked if I did this professionally, which made me laugh because I'd assembled the caps at my kitchen counter while half-watching a cooking show.
Ingredients
- All-purpose flour: The foundation here, and weighing it makes a real difference if you have a scale—it keeps the cupcakes tender instead of dense.
- Granulated sugar: Creaming this with butter is the secret to getting that light, fluffy crumb texture.
- Unsalted butter (for cake): Room temperature is non-negotiable; cold butter won't cream properly and your cupcakes will be heavy.
- Eggs: Let them sit out for thirty minutes before you start; cold eggs don't blend in smoothly and you'll get a grainy batter.
- Whole milk: Brings moisture and tenderness to the cake structure.
- Baking powder: Make sure yours is fresh by checking the date on the container; old baking powder means flat cupcakes.
- Salt and vanilla extract: These amplify the flavor so the cake tastes rich despite being simple.
- Unsalted butter (for frosting): Soft butter whips into clouds of frosting; hard butter just lumps up and frustrates you.
- Powdered sugar: Sift it first; lumps turn the frosting grainy and unpleasant.
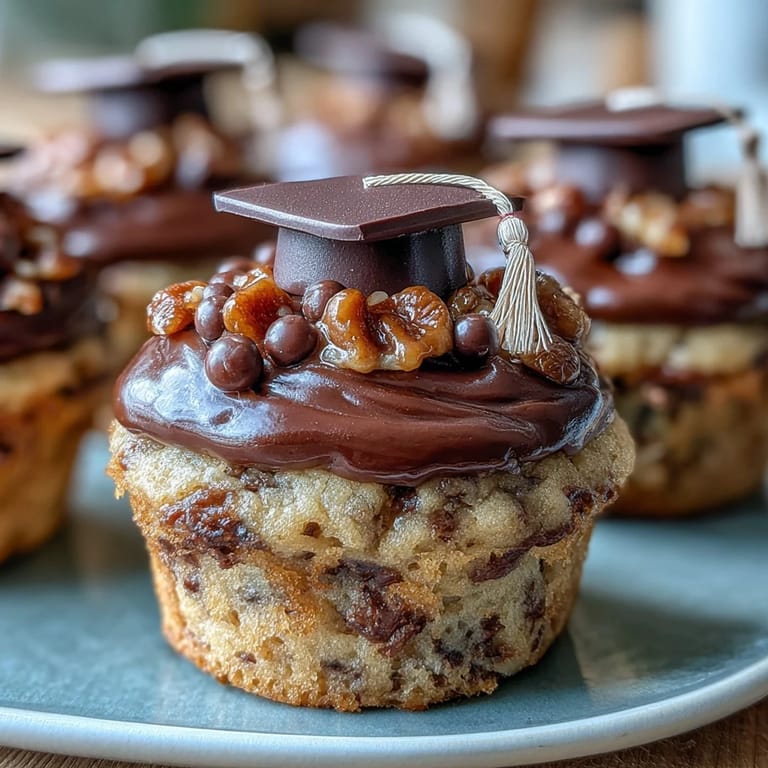
- Mini peanut butter cups: The base of your graduation cap, but swap them for chocolate squares if anyone has nut allergies.
- Chocolate square candies: These become the mortarboard part of the cap and should be positioned flat-side up.
- String licorice or sour candy strips: Cut these into pieces for the tassel; they add that playful detail that makes people smile.
- Mini M&Ms or candy pearls: The little finishing touch that looks intentional and decorative.
Tired of Takeout? 🥡
Get 10 meals you can make faster than delivery arrives. Seriously.
One email. No spam. Unsubscribe anytime.
Instructions
- Get your oven ready and prep the pan:
- Preheat to 350°F and line your muffin tin with paper liners so the batter doesn't stick and you can actually remove these things without tearing them apart. This step takes thirty seconds and saves you from cupcake disasters.
- Cream butter and sugar together:
- Beat them for about two minutes until the mixture looks pale and fluffy, almost like soft serve ice cream—this incorporates air that makes the cupcakes light. You'll know it's done when you can't see the sugar granules anymore.
- Add eggs one at a time:
- Beat each egg in fully before adding the next one, then stir in vanilla extract until everything looks smooth and emulsified. If it looks separated or curdled, don't panic; it'll come together once you add the dry ingredients.
- Mix dry ingredients in a separate bowl:
- Whisk together the flour, baking powder, and salt so the leavening is distributed evenly throughout the batter. This prevents dense pockets in some cupcakes.
- Combine wet and dry in stages:
- Add half the dry mixture, mix gently, then pour in the milk, then finish with the remaining dry ingredients—this method prevents overmixing, which makes cupcakes tough. Mix just until you see no white streaks of flour.
- Divide batter and bake:
- Fill liners about two-thirds full and bake for eighteen to twenty minutes until a toothpick poked in the center comes out clean or with just a crumb or two clinging to it. The smell will tell you when they're almost done—that warm vanilla aroma filling your kitchen is the signal.
- Cool completely before frosting:
- Let the cupcakes sit in the pan for five minutes, then transfer them to a cooling rack for at least thirty minutes, ideally longer. Frosting warm cupcakes is a losing battle; it melts and slides right off.
- Make the frosting:
- Beat softened butter until smooth, then gradually add sifted powdered sugar a little at a time so you don't create a flour cloud in your kitchen. Once it comes together, add milk, vanilla, and salt, then beat for about a minute until it's fluffy and spreadable—it should look like clouds.
- Frost the cupcakes:
- A simple swirl on top works best; you can use a spatula, the back of a spoon, or even a piping bag if you're feeling fancier. Whatever style you choose, the frosting should be thick enough to hold a peak.
- Assemble the graduation caps:
- Place a chocolate square flat-side up, then dab a tiny bit of melted chocolate or frosting in the center and press a mini peanut butter cup upside-down onto it—this creates the base of the cap. Attach a piece of licorice as the tassel on one edge, add a mini M&M or pearl as the button on top, and let everything set for a few minutes before placing the finished cap on a frosted cupcake.
 Save
Save Standing in my cousin's kitchen the next morning, I found three leftover cupcakes she'd saved me, and she told me someone had asked if I was catering her party. It's funny how something so simple—vanilla cake and candy pieces—becomes this moment people remember when they think about graduation.
Why This Recipe Works for Celebrations
There's something about a cupcake that makes people feel celebrated without being overwrought. You can bake these three days ahead, frost them the night before, and add the caps the morning of the party, which means you actually get to enjoy the event instead of spending it in the kitchen. The built-in decorations do the heavy lifting visually, so you look thoughtful without needing professional baking skills.
Making These Your Own
The frosting takes food coloring beautifully if you want to match school colors, and a few drops of almond or lemon extract in the cake batter changes the whole flavor profile without requiring a different recipe. I've also made these with chocolate cake by swapping out a quarter cup of flour for cocoa powder, which deepens the richness without being overwhelming.
Storage and Serving Suggestions
These cupcakes stay fresh at room temperature in an airtight container for up to two days, which is perfect for making them ahead. If you need them longer, the unfrosted cakes freeze beautifully for up to a week, though the caps should be assembled fresh right before serving so the licorice stays chewy.
- Transport them in a sturdy box with dividers so the caps don't get jostled around in the car.
- If anyone has nut allergies, skip the peanut butter cups entirely and use two chocolate squares stacked as the cap base instead.
- The candy components are flexible—use whatever small candies you like or that match the school colors for a personalized touch.
 Save
Save These cupcakes have a way of becoming part of someone's graduation memory, which honestly is all I set out to do when I first thought about what to bring. They're simple enough that you won't stress, impressive enough that people will think you spent hours, and genuinely delicious on top of it all.
Recipe FAQs
- → What alternatives can I use for the peanut butter cups?
You can substitute mini chocolate squares to avoid nuts for those with allergies while maintaining the cap shape.
- → How can I make the buttercream frosting smoother?
Ensure the butter is softened well before beating, then gradually add powdered sugar and milk, mixing until light and fluffy.
- → How long do these cupcakes stay fresh?
Stored in an airtight container at room temperature, they remain fresh for up to two days.
- → Can I add color to the frosting?
Yes, food coloring can be mixed into the frosting to match school or party colors for a personalized look.
- → What is the best way to assemble the cap toppers?
Use a small amount of melted chocolate or frosting to attach the chocolate cup and licorice tassel securely on the cupcake.