Save
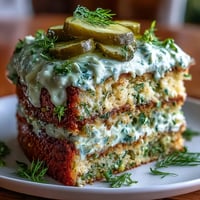
Save My friend texted me three weeks before graduation asking if I could make "something special" for her backyard celebration. She didn't ask for flowers or balloons, just a cake that felt like an achievement itself. That's when I started experimenting with gold leaf and this vanilla sponge—simple enough to stay elegant, rich enough to taste like it took all summer to perfect. The first attempt had uneven layers and buttercream that looked more rustic than intentional, but by the third try, something clicked. Now whenever I frost one of these, I picture that moment when she saw the gold catching the afternoon light, and suddenly it wasn't just dessert anymore.
I'll never forget watching my cousin's mom taste the first slice at the actual celebration. She closed her eyes, and I genuinely thought something was wrong until she opened them again and said, "This tastes like someone actually cared about today." That's the magic of this cake—it's not complicated, but the little details signal that you showed up for someone's moment.
Ingredients
- All-purpose flour (2 ½ cups): This is your foundation, and it matters that you spoon it gently into the measuring cup rather than scooping straight from the bag—I learned that lesson the hard way when my first cake turned dense and tight.
- Baking powder (2 ½ tsp): Double-check the expiration date; old baking powder won't give you that tender crumb that makes people reach for seconds.
- Unsalted butter (1 cup for cake, 1 ½ cups for frosting): Room temperature is non-negotiable here—cold butter won't incorporate smoothly, and your batter will look grainy instead of fluffy.
- Granulated sugar (2 cups): This sweetens the cake while helping it rise; don't skip or reduce it thinking you'll adjust later because the chemistry won't cooperate.
- Eggs (4 large, room temperature): Cold eggs seize up the batter; set them on the counter while you prep everything else and they'll come around.
- Vanilla extract (1 tbsp for cake, 2 tsp for frosting): Real vanilla makes a difference you can taste, especially in something this simple where there's nowhere for mediocre ingredients to hide.
- Whole milk (1 cup for cake, 3-4 tbsp for frosting): The slight fat content keeps the cake moist longer than water ever could.
- Powdered sugar (5 cups, sifted): Sifting takes two minutes and eliminates lumps that would ruin the frosting's silky texture; skip this step and you'll regret it.
- Edible gold foil sheets: These are almost weightless and require dry hands or tweezers to apply—humidity is their enemy, so work quickly and deliberately.
- Diploma topper: Store-bought saves time, but a fondant one you make yourself tastes better and feels more personal.
Tired of Takeout? 🥡
Get 10 meals you can make faster than delivery arrives. Seriously.
One email. No spam. Unsubscribe anytime.
Instructions
- Set the stage:
- Preheat your oven to 350°F and line two 9-inch round pans with parchment—this takes three minutes and saves you from the heartbreak of cake stuck to metal. Get your butter and eggs out now if they're not already softening on the counter.
- Mix the dry team:
- Whisk flour, baking powder, and salt together in a medium bowl, making sure everything is evenly distributed. This prevents streaks of raw baking powder in your finished cake.
- Cream the foundation:
- Beat softened butter and sugar together on high speed for 3-4 minutes until it looks pale, fluffy, and almost cloud-like. This step does the aerating work that helps your cake rise gently and evenly.
- Add eggs thoughtfully:
- Add eggs one at a time, beating well between each addition so they emulsify properly into the butter mixture. If you dump all four in at once, the batter will look curdled and sad.
- Stir in vanilla:
- Add vanilla extract and mix until you smell it everywhere—that's how you know it's incorporated.
- Build the batter in layers:
- Add flour mixture and milk alternately, starting and ending with flour, mixing only until just combined. Over-mixing gluten activates and toughens the cake; you want tender, not chewy.
- Divide and smooth:
- Pour batter evenly into prepared pans and smooth the tops with an offset spatula so they bake evenly. Uneven surfaces lead to dome-shaped cakes that need aggressive leveling.
- Bake with patience:
- Bake 28-32 minutes until a toothpick comes out clean and the edges just barely pull away from the pan. Every oven is different, so start checking at 27 minutes.
- Cool strategically:
- Let cakes rest in pans for 10 minutes, then turn them out onto wire racks to cool completely—this prevents steam from making them dense. Patience here saves you from crumbly cake layers later.
- Make buttercream magic:
- Beat softened butter on high for about 3 minutes until it's pale and creamy, then gradually add sifted powdered sugar while beating continuously. Add vanilla, salt, and milk until you reach a texture that's smooth and spreadable, not thick and grainy.
- Level the layers:
- If your cakes have domes, use a serrated knife to carefully slice them flat—this gives you even layers that stack without sliding. A cake turntable makes this easier, but a cutting board works too.
- Build the structure:
- Place the first layer on your serving plate and spread a generous layer of buttercream on top, then set the second layer on it gently and carefully.
- Apply crumb coat:
- Spread a thin layer of frosting all over the cake to seal in crumbs, then chill for 30 minutes—this prevents those stray crumbs from messing up your final frosting.
- Frost like you mean it:
- Apply the remaining buttercream smoothly with an offset spatula, working in deliberate strokes and turning your cake turntable as you go. If you see frosting scratches, chill for 10 minutes and smooth over them gently.
- Gold foil moment:
- Using dry tweezers, carefully apply edible gold foil sheets to the sides or top of the cake in whatever pattern feels celebratory. Gold is delicate, so handle it gently and it'll catch the light beautifully.
- Crown with the diploma:
- Place your diploma topper at the center or side of the cake where it looks balanced and intentional. Step back and admire before adding any sprinkles or confetti.
- Set and serve:
- Chill the finished cake briefly to set everything, then let it come to room temperature for the best flavor—cold cake tastes a little muted.
 Save
Save There's something about watching someone blow out a candle on a cake you made that shifts the whole experience. It stops being about technique or ingredients and becomes about witnessing someone feel celebrated, and that's worth the 40 minutes of careful measuring and mixing.
Why Room Temperature Matters More Than You'd Think
The first time I made this cake with cold butter straight from the fridge, everything looked curdled and grainy, and I spent twenty minutes wondering what I'd done wrong. Turns out, cold butter can't emulsify smoothly with sugar, so it stays in little pockets throughout the batter instead of creating an airy, uniform mixture. Now I always pull butter out of the fridge an hour before baking, and the difference is honestly night and day—the cake rises more evenly, tastes more tender, and frosting spreads like butter should. If you're in a rush, you can cut cold butter into small cubes and let them sit for 20 minutes in a warm kitchen, but planning ahead makes everything smoother.
Gold Foil: Delicate But Worth It
Edible gold foil intimidates people because it feels expensive and fragile, but it's actually forgiving if you respect its one weakness: humidity. The moment your hands are even slightly damp, the gold clings to your skin instead of the cake, and then you've got a pile of sticky, crumpled gold on your fingers. Work with tweezers and make sure your hands are completely dry, and you'll apply it cleanly in about two minutes flat. I learned to apply gold after the cake has been chilled and frosting has set, because soft frosting sometimes pulls when the delicate foil touches it. One sheet goes a long way—I usually use four to six sheets total, arranging them in a pattern that feels balanced rather than covering the entire cake.
Buttercream Texture and Timing
The consistency of your buttercream depends on kitchen temperature and humidity, so trust your eyes more than the recipe measurements. If your frosting looks thick and grainy, add milk one tablespoon at a time and beat for a few seconds between additions until you hit that sweet spot where it's creamy and spreadable but holds its shape. On a hot day, your frosting might need a little less milk; on a cool day, a little more.
- If frosting looks broken or curdled while mixing, it usually just needs three minutes of continuous beating to come back together smoothly.
- Store decorated cake in the fridge but bring it to room temperature before serving so the buttercream tastes rich instead of waxy.
- Make buttercream up to two days ahead and store it covered in the fridge, then let it soften at room temperature before re-beating and frosting.
 Save
Save This cake celebrates something worth celebrating, and that shine—literal and figurative—makes all the careful steps feel like a small, delicious gift. Make it for someone who earned their moment.
Recipe FAQs
- → What type of cake base is used?
A moist vanilla sponge made with all-purpose flour, baking powder, butter, eggs, and vanilla extract forms the base.
- → How is the buttercream frosting prepared?
Butter is beaten until creamy, then powdered sugar, vanilla, salt, and milk are added to create a smooth, spreadable frosting.
- → How do you apply edible gold foil properly?
Use tweezers and handle the gold foil with dry hands to gently place it on the frosting without tearing.
- → Can the diploma topper be made edible?
Yes, by crafting it from fondant and decorating with edible markers for a fully edible decoration.
- → What is the recommended baking temperature and time?
Bake at 350°F (175°C) for 28–32 minutes until a toothpick comes out clean.